

Storage Shed in Animal Crossing: New Horizons, has brought a huge number of new things and increments to the game. Players can unlock a new bistro in the exhibition hall, investigate secret islands in a new way, and plant and develop Gyroids. However, getting a portion of these new things and unlocking a portion of these new highlights can be somewhat of a test.
This is valid for the as of late added storage shed in Animal Crossing: New Horizons that permits players to get to their home storage while beyond their home. For those players looking to more readily comprehend how they need to unlock the storage shed, this guide is here to help.
The Storage Shed is, straightforwardly, a shed that allows you to store things — in your Storage, explicitly. Included the 2.0 Update, gone are the times of having to run back to your home each time you need to exhaust your pockets or store a thing away.
The Variant 2.0 update for Animal Crossing: New Horizons has shown up, and it adds a ton of new elements and personal satisfaction enhancements to the game, for example, the capacity to open The Perch bistro in your Gallery and overhaul your NookPhone’s camera.
Unlocking Storage Shed in Animal Crossing: New Horizons
The storage shed is somewhat of a scope for new Animal Crossing: New Horizons players as it requires an incredible investment. Pilgrim Title in WoW Classic In request to have the option to buy the storage shed, players must have totally overhauled their endlessly home storage framework. This is a combined 6 million ringers worth of redesigns and comprises of adding an entire host of new rooms to a player’s home. Therefore, the Storage Shed is truly just a sensible investment for the people who have previously done these overhauls.
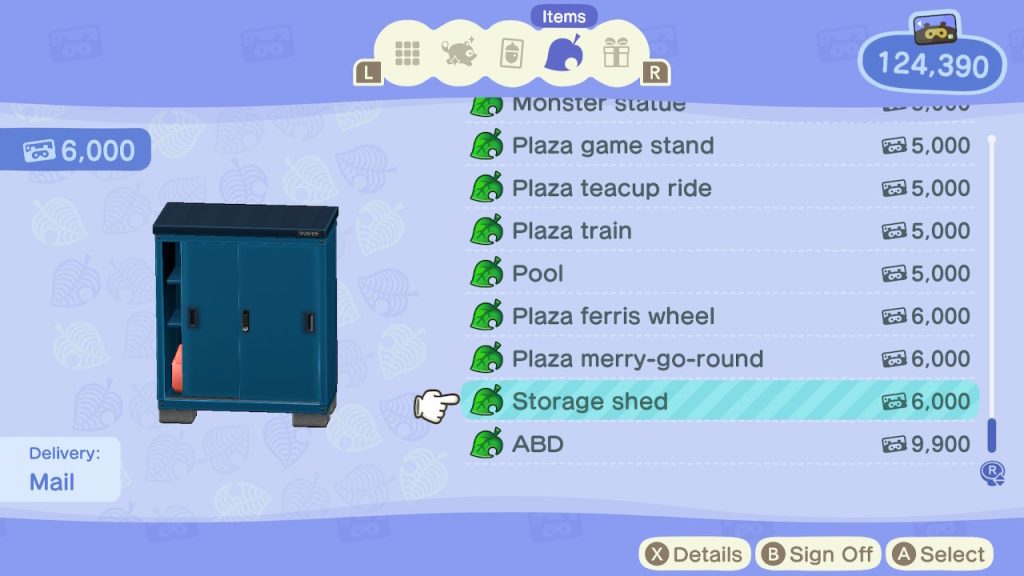
When those are undeniably finished, however, acquiring a storage shed is a generally simple matter. Players need to head into Inhabitant Administrations and actuate the Alcove Stop Terminal. Players will know this as the spot where they can pay their moving expenses in Animal Crossing: New Horizons as well as their credits. To start with, click the choice “Recover Niche Miles” and afterward tab over to the “Things Rundown”. Scrolling down ought to show the storage shed choice for 6,000 Alcove Miles. Likewise with other buys here, it will show up the following day via the post office.
How to Customize the Storage Shed
The Storage Shed you buy from the Alcove Stop just comes in a single variety like the remainder of the Niche Miles things. Beforehand, the main way you could get new varieties was to exchange with another player yet the 2.0 Update has changed this.
Fly on over to Harv’s Island from your Air terminal and he’ll introduce you to the new Square. Here you can buy new shops and administrations — including Reese and Cyrus. Address the Lloid who specifies “a skilled a couple furniture-refurbishing group” and pay 100,000 Chimes to unlock the pair.
Where to put the outdoor Storage Sheds?
With storage sheds in inventory, the following inquiry is where best to put it? Indeed, close to where you hope to utilize it, fundamentally. On the off chance that you have a decent farming set ready for cooking Do-It-Yourself, assuming that you’re renovating a piece of your island, or essentially need a convenient drop-off point prior to stepping onto a plane or boat, this will help choose where you put them.
Moreover, you can continuously convey a storage shed around in your inventory and afterward put it for in a hurry admittance to your full home storage. Like a witch’s satchel!

In Animal Crossing: New Horizons, what’s the storage shed, and how do I unlock it?
Nintendo showed off an external home storage framework for Animal Crossing: New Horizons in its October announcement, allowing players to access stored merchandise from a storage shed. However, incidentally, the Wooden storage shed and Storage shed — two separate things — aren’t immediately available after downloading the 2.0 update.
Instead, they’ll open up after you’ve upgraded your home storage past the 500,000 Chimes storage level. Mii on Your Nintendo Switch and that means you want to have a completely upgraded house, too. You can do this by visiting Tom Alcove at Occupant Administrations and paying 500,000 Chimes to Tom Niche, in the event that you hadn’t already. (Assuming you have, skirt this step.) Development will be done the following day, and that’s the point at which you’ll have the option to access the storage sheds, right back at Occupant Administrations.
You can purchase the Wooden storage shed Do-It-Yourself recipe with Niche Miles — it costs 6,000 of them. Keep in mind, this thing will just how up assuming you meet 500,000 Chimes storage level at your home. To craft it, it’s gonna cost you 30 wood, hardwood, and softwood each, in addition to 10 iron nuggets.
How do you get a Flimsy Shovel in Animal Crossing: New Horizons?
Keeping the Communicator will bring about it turning into 5 Rusted Parts the following day. This is similar to Gulliver, where keeping the 5 Communicator Parts from him will bring about them turning rusted.
While Rusted Parts may appear to be useless, they are not – they are profoundly pursued as they are part of the recipe to make a Robot Legend (requires Rocket, Gold Armor, 30 rusted parts, 90 iron nuggets, and 10 gold nuggets).
It comes on the telephone when you get it on your second day on the island, you start catching remote ocean creatures, bugs, and fish, and you gradually develop it. Each month there will be a new gathering of remote ocean creatures, bugs, and fish and some returning. There are also some that won’t ever leave.
Examples: Atlas Moth – North: April-September, South: October-March. Bagworm – All year. There are records and apps that you can use to monitor when they come until you catch it, then you’ll see the info on the critterpedia.
Utilize the plan app to create a plan that seems to be a pavement slab or similar and lay them about the island where you want them.