
In this article you will read about Adafruit MacroPad RP2040 Review. There is a small but interesting cottage industry in the Raspberry Pi-driven macro keyboard, you can use it to add some custom functions to your PC. A few years ago, Pimoroni released their Keybow, which is based on the Raspberry Pi Zero, but you must wait for it to start every time you plug it in, and you must program it in Lua.
Then this year Pimoroni launched Pimoroni Keybow RP2040 and Pico RGB keyboard docks, which use Raspberry RP2040 CPU and use multiple programming languages, including CircuitPython. Since Raspberry Pico and other RP2040 boards can be used as USB HID devices, there are several tutorials explaining how to use them to build a custom keyboard.
However, Adafruit’s MacroPad RP2040 stands out and is so useful that even non-manufacturers may want one, just to make their lives easier. MacoPad RP2040 is available as a complete kit for US$49 or as a barebones (no switches or buttons) for US$34. It has a built-in RP2040 chip and has many useful features, including OLED display, rotary encoder turntable, 8 MB flash memory, each The Neopixel RGB light under the button and the Stemma QT connector for connecting other electronic devices such as sensors and additional OLED/LCD displays.
Whether you are a manufacturer who likes DIY projects, or someone who just wants a very flexible second keyboard, the Adafruit MacroPad RP2040 is your best choice.
Adafruit MacroPad RP2040 Specifications
| Processor | Raspberry Pi RP2040 (130 Hz, 264K of RAM) |
| Storage | 8MB of Flash Memory |
| Ports | USB-C / Stemma QT |
| Keys | 3 x 4 hot-swappable sockets |
| RGB | One Neopixel RGB LED per switch |
| Screen | 128 x 64 SH1106 Monochrome OLED |
| Speaker | 8mm Speaker / Buzzer |
| Additional Inputs | Rotary encoder (pressable), Reset button |
| Size | 4.1 x 2.3 x 1.1 inches (104 x 59.5 x 29mm) |
| Weight | 1.2 ounces (34g) |
Adafruit MacroPad RP2040 Configuration Choices
You can buy the Adafruit MacroPad as a complete starter kit for $49, or the board for only $34, after which you will need some other components. A $49 kit comes with the board, 12 Kailh linear red key switches, 12 transparent keys, and a MacroPad snare kit, all of which are sold separately on Adafruit.com.
A $5 cabinet kit must be purchased if you light up the table, because it includes a bottom plate and feet under the table, a top plate that holds the key switch in place, and a rubber knob that slides into place. Find. At the top of the table. Rotary encoder and screws needed to fix the base plate. Because I don’t like the feel of linear switches, I bought a bare board and box kit, and brought my own key switch, a set of very clickable Kailh Box Jades.
I attached some transparent keys on which I was sitting, but in the end I also bought some translucent blue hats sold separately by Adafruit. In short, if you like linear switches or don’t care about one way or the other, then it will be easier to buy a complete kit. If you prefer other switches, please do what I do. Whatever you do, make sure you get the enclosure kit; you need it.
However, Adafruit’s MacroPad RP2040 stands out from the rest and is so useful that even non-makers may want one, just to make their lives easier. Available either as a complete kit for $49 or as a barebones (no switches or keycaps) for $34, the MacoPad RP2040 has a built-in RP2040 chip with a slew of helpful features, including an OLED screen, a rotary encoder dial, 8MB of Flash storage, Neopixel RGB lights under each key and a Stemma QT connector for attaching other electronics such as sensors and additional OLED / LCD screens. Whether you’re a maker who likes DIY projects or just someone who wants a really flexible second keyboard, the Adafruit MacroPad RP2040 is your best choice.
Specifications of Adafruit MacroPad RP2040
| Processor | Raspberry Pi RP2040 (130 Hz, 264K of RAM) |
| Storage | 8MB of Flash Memory |
| Ports | USB-C / Stemma QT |
| Keys | 3 x 4 hot-swappable sockets |
| RGB | One Neopixel RGB LED per switch |
| Screen | 128 x 64 SH1106 Monochrome OLED |
| Speaker | 8mm Speaker / Buzzer |
| Additional Inputs | Rotary encoder (pressable), Reset button |
| Size | 4.1 x 2.3 x 1.1 inches (104 x 59.5 x 29mm) |
| Weight | 1.2 ounces (34g) |
Configuration Choices for Adafruit MacroPad RP2040
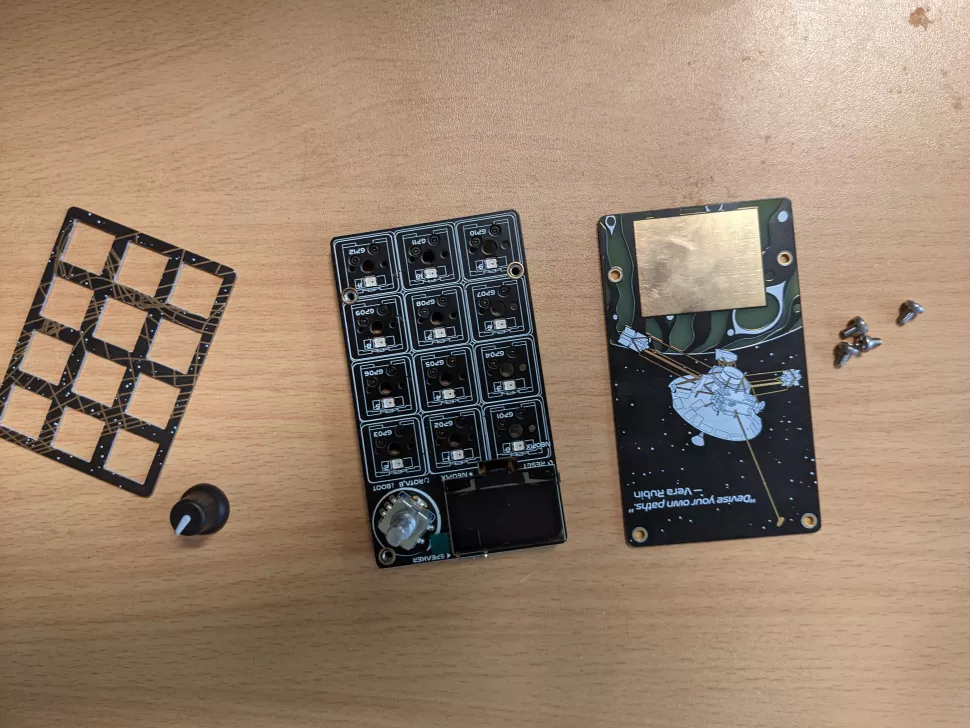
You can buy the Adafruit MacroPad either as a complete Starter Kit for $49 or just the board for $34, after which you will need some other components. The $49 kit comes with the board, 12 Kailh linear red key switches, 12 clear keycaps and the MacroPad enclosure kit, all of which are also sold separately at Adafruit.com. The $5 enclosure kit is a must-buy if you get the bare board, because it includes a bottom plate and feet to go below the board, a top plate that holds the key switches in place, a rubber knob that sits on top of the rotary encoder and the screws you need to attach the bottom plate.
Because I don’t like the feel of linear switches, I bought the bare board and the enclosure kit and brought my own key switches, a set of very-clicky Kailh Box Jades. I attached some clear keycaps I had sitting around, but eventually also bought some translucent blue caps that Adafruit sells separately. In short, if you like linear switches or don’t care one way or the other, it’s easiest to buy the full kit. If you prefer other switches, do what I did. Whatever you do, make sure you’re getting the enclosure kit; you need it.
Design of the Adafruit MacroPad RP2040

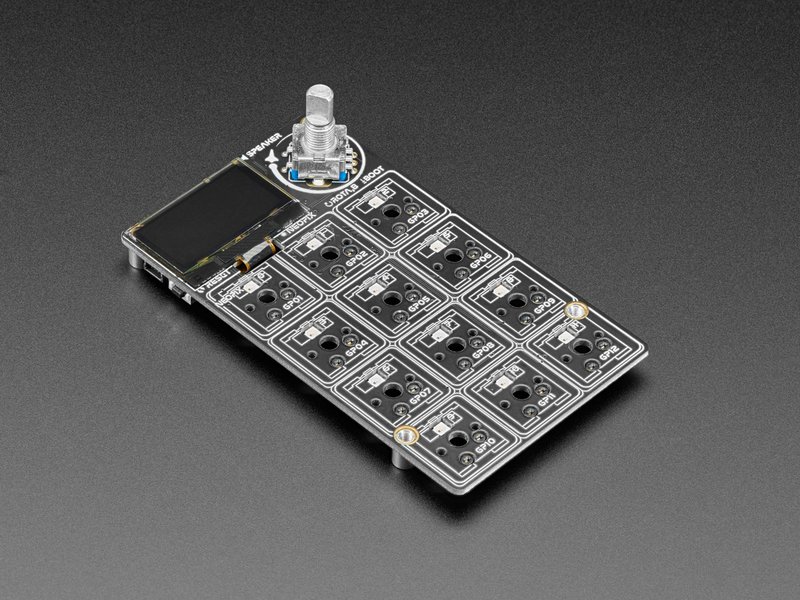
The Adafruit MacroPad RP2040 measures 4.1 x 2.3 inches and is very compact. It uses the least space to display its four rows of three buttons per row, with a small 128 x 64 monochrome OLED display and a rotary encoder, covering the top Row of keys. There is a USB-C port on the back of MacroPad RP2040, which is used to obtain power and exchange data with the computer. On the left is the physical reset button and Stemma QT port. Enter the boot selection mode and install the new firmware.
You need to press the rotary encoder while booting. The MacroPad is a bit like a NASA theme, because there is a small space shuttle icon near the encoder. And the word “Speaker” on the blackboard is written in a font very similar to NASA. If you buy a box kit or starter kit with a box, there is a keyboard picture and markings at the bottom and the word MacroPad in the same font. You can also read about AOC Agon AGM700 Review from here.
Depending on how you program, there are also many opportunities to add colors, because there is an individually addressable RGB Neopixel light under the switch of each key. More importantly, the bottom plate lifts the keyboard 1.1 inches away from the desktop, but this is still true.
The leaves are significantly lower than my normal keyboard. There is no built-in method for adjusting the height of the MacroPad RP2040, but Adafruit has several 3D printable cabinets/stands that you can use as long as you can use a 3D printer.
Adafruit MacroPad RP2040 Assembly and Setup
Setting up the Adafruit MacroPad RP2040 is a fairly fast process, although getting all 12 switches to be plugged into the hot-swappable plugs on the board took a few attempts, because the switch disconnected several times when I tried to push the board down.
They Shell kit. I find it easier to put all the switches on the board and press them down. However, after installing all the switches, they are sturdy and will not be used frequently. It only takes a moment to screw in the bottom plate, and you may want to tighten it before turning on the switch to avoid accidentally removing them during the process.
Whether you get a snare drum kit or not, you should place some kind of lid knob on the rotary encoder turntable. This process takes a few seconds. To perform any operation with MacroPad RP2040, you need to install CircuitPython firmware.
Especially the current 7th edition. As with any other RP2040 board, this is easy to do. Simply download the appropriate UF2 file from the MacroPad page of CircuitPython.org, boot the device into boot selection mode (press and hold the rotary encoder button when turning on/connecting to the PC), then drag the UF2 file onto the board and display it as marked RPI-RP2 storage unit (same as all other RP2040 boards).
You also need to install some CircuitPython libraries. Depending on what you want to program, you may need displayio, adafruit_hid or adafruit_displaytext libraries, etc. Adafruit also has a dedicated adafruit_macropad library, which is only available for this device.
Conclusion
Adafruit MacroPad RP2040 has many things to love, not too many things to object to. Compared with competitors (such as Pimoroni Keybow RP2040), the pad provides more flexibility and functionality. However, if you don’t like the idea of putting your own keyboards together and writing code, there are many out-of-the-box keyboards, such as the Elgato Streamdeck series or Coolermaster ControlPad.
No equipment is perfect. I want the MacroPad to be adjustable in height so that I can place it at the same height and angle as a normal keyboard, although the 3D printed stand allows me to get there.
Having a color screen instead of a monochrome screen will be another benefit, but it will definitely push up the price, but considering all factors, the MacroPad RP2040 is an excellent device that any electronics enthusiast or productivity fanatic will love. Just consider whether you like linear switches. If not, skip the starter kit and purchase the basic kit and boxed kit, as well as the switch and lid of your choice.