

Complete The No Peeking Triumph in Destiny 2, you can close dimness cracks concealed around Savathun’s Throne World. Shutting each of the ten fractures will net you the No Peeking Triumph, which you really want to finish the Gumshoe Seal. To close these fractures, you really want to shoot them while having the “Worm Byproduct” buff concerned you. To apply this buff, you should shoot yourself with the outlandish weighty explosive launcher Parasite. Assuming you want assistance getting that outlandish, you can follow our aide here.
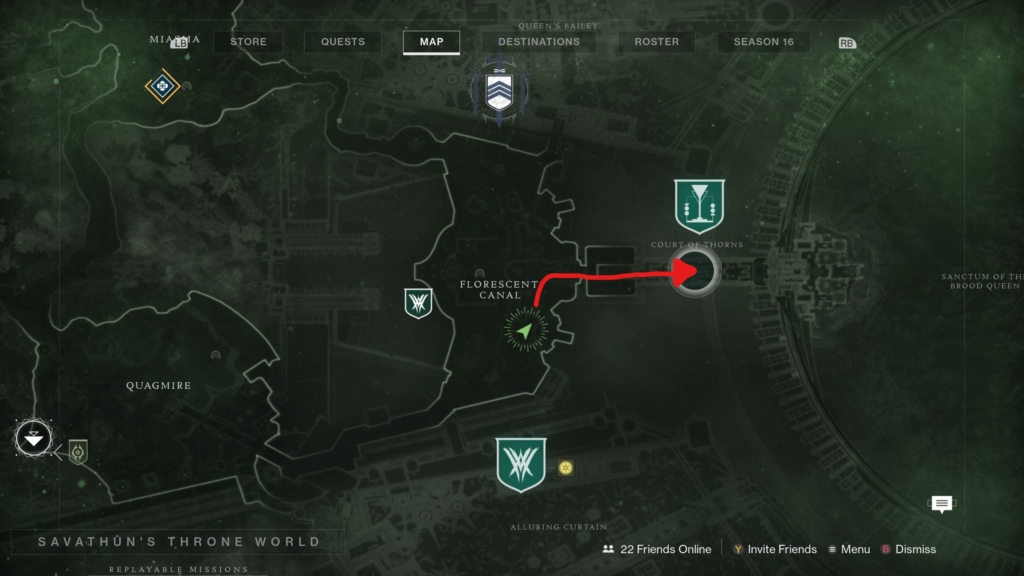
In this Destiny 2 aide, we will go over the areas for every one of the ten Darkness Rifts found across court of thorns destiny 2 Savathun’s Throne World to acquire the No Peeking Triumph.
How to Complete The No Peeking Triumph in Destiny 2
To get this Triumph, you want to close all Darkness Rifts in the Throne World. Presently, the game doesn’t let you know this, however you want to get your hands on the Parasite colorful projectile launcher prior to endeavoring to get this Triumph.
1. Entanglement Darkness Rift
- Your most memorable Darkness Rift can be found in the Quagmire watch zone. At the point when you bring forth, bounce onto your sparrow and head right as though you were going to the Queen’s Bailey watch region. Just before you pass under the monstrous white curve, go to one side to see a little structure (displayed above) with a couple of Hive protecting it. Kill the foes and head into this square construction.
- Above you ought to be a slight line of Darkness energy — Waking Moment this is the fracture. Prepare Parasite and shoot it at your feet to allow yourself the Worm Byproduct buff. Trade to your essential weapon and shot the Darkness Rift a couple of times to close it.
2. Extraction Darkness Rift (Quagmire Lost Sector)
The following Darkness Rift can be found in the Extraction Lost Sector in the Quagmire. Head within this lost area through the cavern entrance along the bluffs and battle your direction to the last chief. When the Guardian Wizard is killed, move toward the chest by the passage and prepare your Parasite. Shoot your feet to get the buff, then, at that point, impact the Darkness Rift right over the entryway driving out of the manager room.
3. Colorific Canal Darkness Rift

Go to the Florescent Canal watch region and keep to the left side along the precipices. You will see three little pinnacles sticking away from the bulwarks. Go to the center one and walk cautiously along the external edge of the pinnacle until you’re facing the upward iron bars. Shoot the Parasite against the divider and impact the Darkness Rift straightforwardly opposite this pinnacle over the hole.
4. Catacomb Darkness Rift (Florescent Canal Lost Sector)
Yet again now go to the Florescent Canal’s Lost Sector and, fight your direction to the last supervisor room. When the spot is clear of foes, focus on the left of the chest. You ought to see the Darkness Rift settled in a corner.
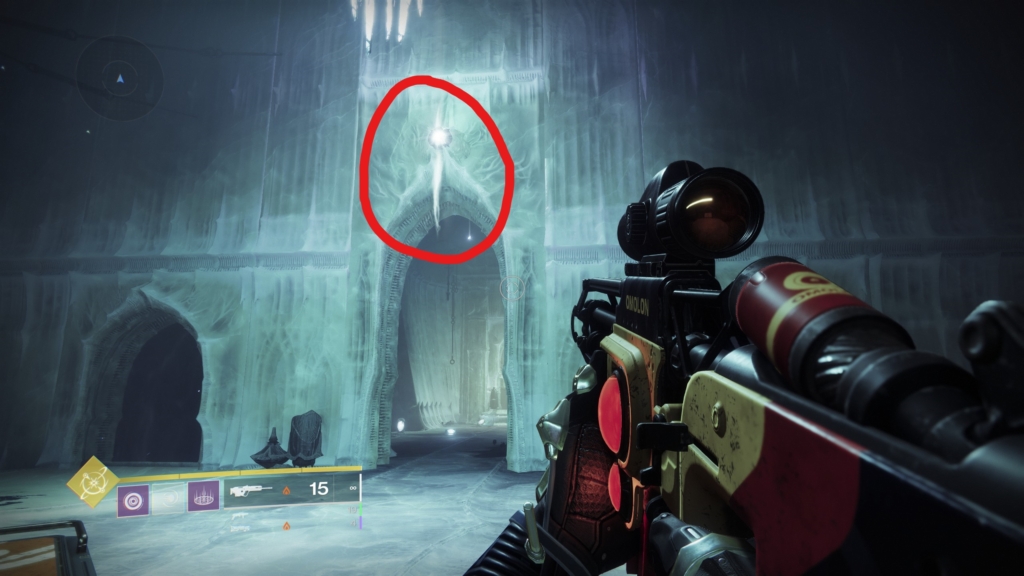
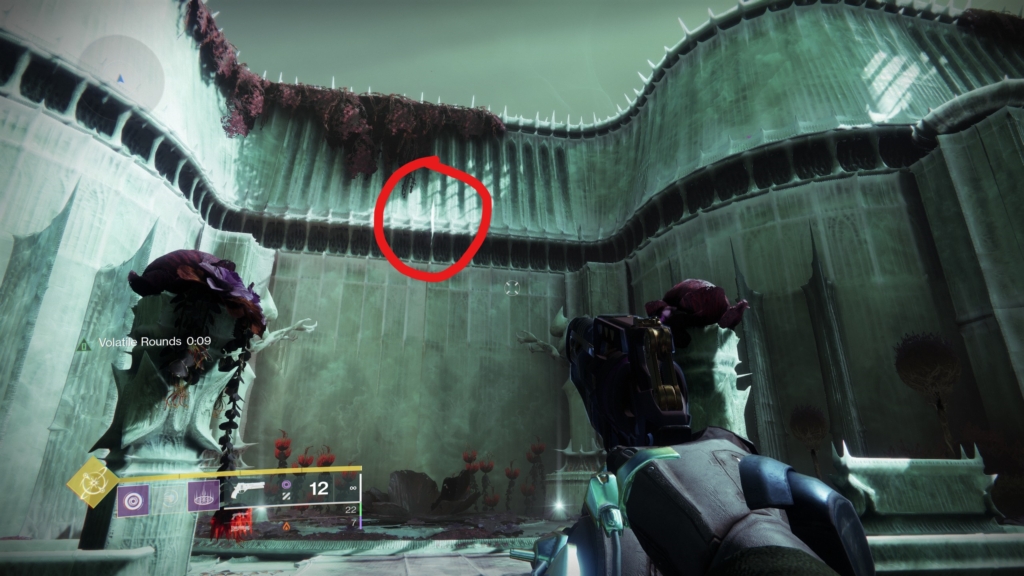
5. Court of Thorns Darkness Rift
- From the Florescent Canal, go to the enormous white keep along the right half of the watch zone. Go up the steps and follow the way along the long scaffold that leads towards Savathun’s royal residence (displayed previously). You will meet unfriendly opposition along the extension, however you shouldn’t experience any difficulty managing the little gatherings of Hive.
- Here’s where things get interesting. This Darkness Rift is at present messed with and doesn’t outwardly show up. Notwithstanding, you can in any case annihilate it assuming that you shoot perfectly located while under Parasite’s buff. You should shoot along the right half of the spike standing out of the divider (circumnavigated previously). Since you’ll have to spam shots along the right half of that spike until you get a harm number, Warlock Grenade Type Ranked you’ll doubtlessly require a Scout Rifle. One projectile ought to be to the point of shutting the crack, so spam shots in the circumnavigated region until it pops.
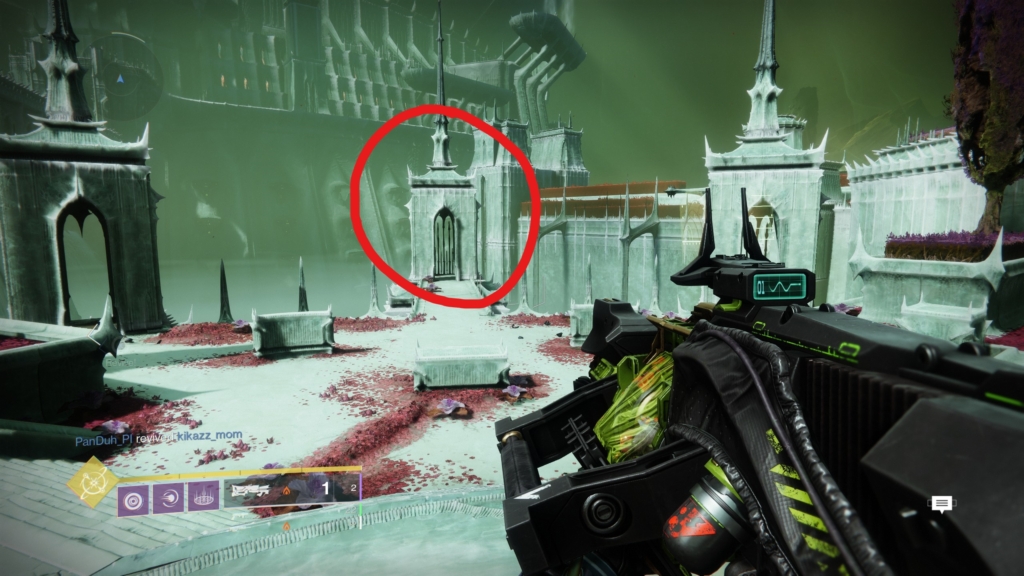
6. Sovereign’s Bailey Darkness Rift
- We aren’t finished with this area yet, so return to the Florescent Canal and travel north towards Queen’s Bailey. In the event that you’ve been doing the Fynch experience ranch, you ought to be exceptionally acquainted with this area at this point.
- Head down the long flight of stairs to the patio loaded up with Hive foes. Kill the ones straightforwardly before you and afterward focus on the left. You ought to see two Hive sculptures asking, and the Darkness Rift drifting between them. Yet again use Parasite to get your buff and shoot this fracture into pieces.
7. Miasma Darkness Rift
The following Darkness Rift is in the Miasma region toward the north, so quick travel back to the Quagmire and follow the course towards this area. When you show up, keep to the left half of the watch zone until you observe a little street prompting a huge Hive sanctuary. There are normally two Hive Guardians standing watch, so kill them and afterward approach the heap of cartons on the right. You ought to see the Darkness Rift along the crates displayed previously.
8. Transformation Darkness Rift (Miasma Lost Sector)
Gracious look, one more Lost Sector you really want to plunder. Go to the Metamorphosis Lost Sector in the Miasma and fight your direction to the supervisor room one final time. After you kill the Scorn adversaries, open the chest and take a gander at the gravity lift. You really want to ride it up to the top and shoot the Darkness Rift before you pass by it. Simply relax, you can constantly ride the lift up once more on the off chance that you miss it. Fire the Parasite at your feet before rapidly going up the lift. At the peak of the lift, look towards the floor beneath to see the fracture you really want to shoot.
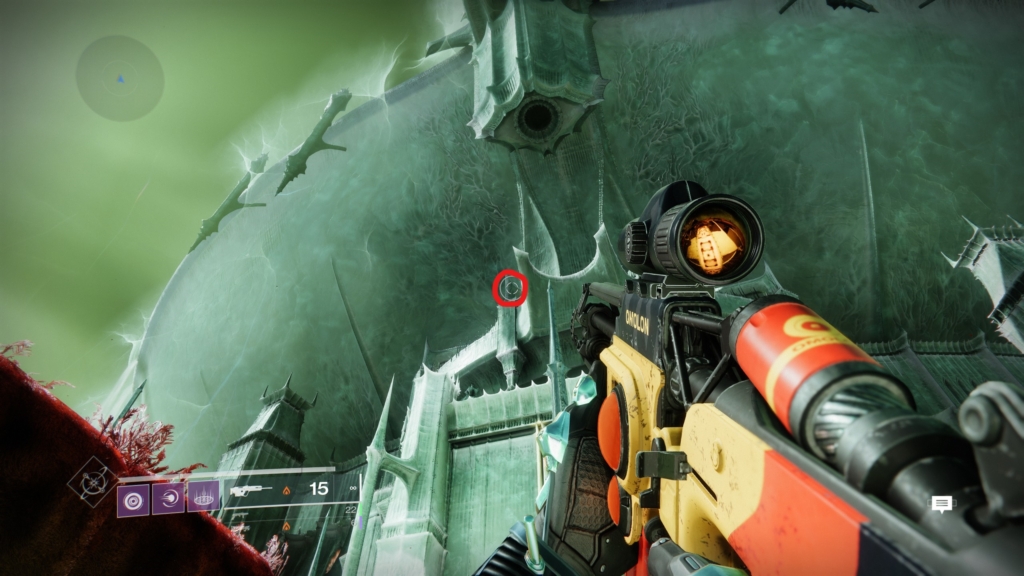
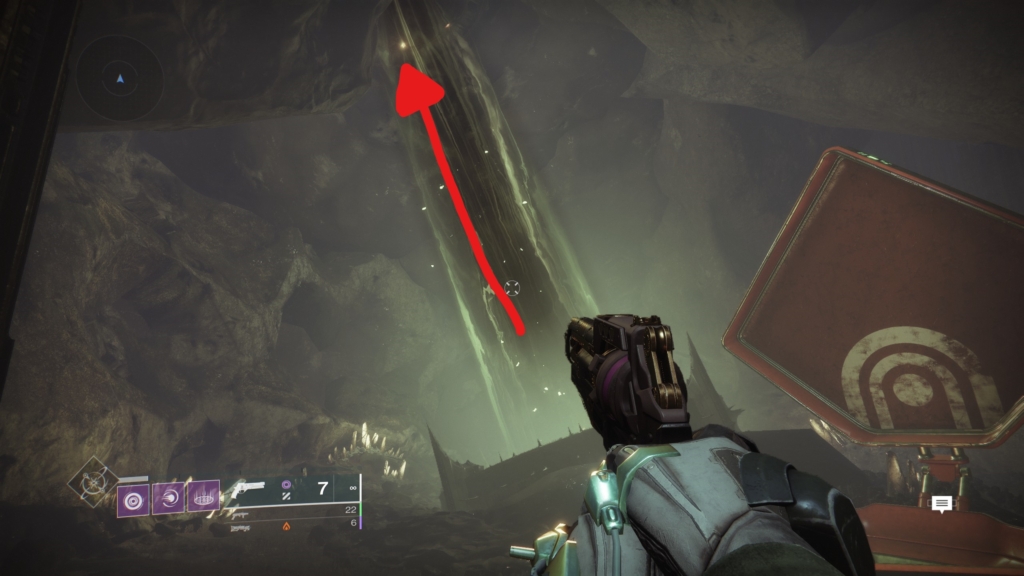
9. Sanctuary of the Cunning Darkness Rift
- It wouldn’t be a Destiny 2 collectible in the event that you didn’t have to go through an area for 15 minutes to track down it. This one is irritating and simple to become mixed up in the event that you haven’t wandered into the profundities of the Hive sanctuaries. Return to the Quagmire, slice through the center, and search for a huge underground cavern entrance on the left. You ought to see a dazzling orange lamp just beyond the entry. Assuming that you are experiencing difficulty, you can see the way I took on the guide above.
- Follow the passage framework until you arrive at the Temple of the Wrath. You will ultimately arise in an enormous room with a haziness entrance drifting over a raised region on the right. Go through the entry and afterward bring a left down the slope. Somewhere far off, you ought to see a scaffold prompting an entryway on the right. Travel that way, cross the extension, and follow the long passage framework. From here, it’s a straight shot to the Temple of the Cunning, so continue onward through rooms until you arise over the enormous extension from the story mission.
- The Darkness Rift is down along the bluffs to one side of this enormous scaffold. Bounce down and head towards the area displayed previously. Be cautious since there are a ton of Hive and swinging lights that can kill you. When you arrive at the precipices (displayed above), turn upward and the Darkness Rift will be settled on a little edge a couple of meters over your head. This one can be difficult to shoot starting from the earliest stage, move up the side of the stones to get a superior vantage point.
10. Special raised area of Reflection
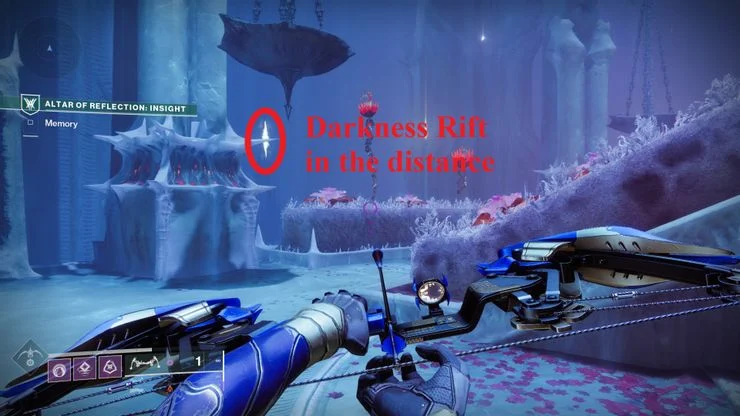
The last Darkness Rift is in the last room of the Altar of Reflection. This region is available by means of the different Altar of Reflection side journeys in the Throne World or through The Mirror lobby mission. Despite which strategy you pick, advance toward the end where you regularly get some story data from Savathun. To one side of the middle presentation, you will see the last Darkness Rift drifting over the pit underneath. On the off chance that you’ve been following my aide, obliterating this will finish the No Peeking Triumph. Simply make a point to turn it in through the Triumph page!